Easy Tips for Adobe Photoshop CS3
Labels: Adobe, CS3, photo shop, Photoshop, tips, Tricks, Tutorial 0 comments
Shadow Highlight Adjustment layer
Shadow Highlight is a great adjustment for bringing back some of the areas that have become plugged up in our photos. The good thing about this adjustment is that we don’t lose any of the detail in the midtones. Perhaps your disappointed because its still not an adjustment layer. Don’t worry because if has that exact functionality with a little workaround. Make your layer a smear object and now apply Shadow Highlight as a Smart Filter. You now have a re-editable Shadow Highlight. This also works for the Variations Adjustment
Hide and seek
Have you gotten used to the new interface yet? Heres’s a tip that will make you love it. As you probably already know, pressing the Tab key will hide all the palettes. Ok you knew that, so it’s not the tip, here’s the tip. If you roll your mouse to the left or right edge of the screen, the palettes will pop out for your use. Make your selection and then roll back to your image and the palettes will disappear again.
Auto Collapse
Here’s another tip to help you love the new interface. Have you noticed that when your in icon mode (everything is minimized) and you expand a palette to choose it’s option, it stays open and now you have to make an extra step to close it? Right click anywhere in the palettes and choose Auto Collapse Icon Palettes. Now when you choose an option and then click in your document, the palette will automatically collapse closed again.
B&W drag to change color
The best way to convert a color photo to Black and White is to use the new Black and White Adjustment. While using this adjustment, you don't need to quess which colors belong to which tones. Drag your mouse over the image and the underlying tone will adjust.
Open JPG in RAW
I’m sure that all the cool new options in Camera Raw haven’t gone unnoticed to you. Don’t you wish that these options were available to all images? Good news, they are. You can now open Jpg and Tiff formats inside Camera Raw and make use of the tools. Right Click on the Image in Bridge and choose: Open In Camera Raw. The jpg or tiff is now open in Camera Raw ready for all the cool tools. Remember though, if you want to take full advantage of the Raw tools, you should shoot in Raw on your camera.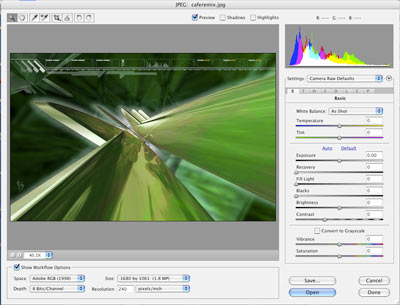
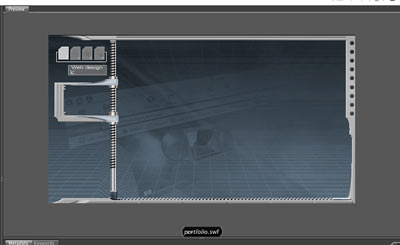
Flashy Bridge
Have you noticed how nice and cool Bridge is now? I know this is a Photoshop Magazine, but as I’m also a Flash Fanatic and Flash is now an Adobe app, I have to say it! The coolest thing in Bridge is that you can now preview swf files. Ok here’s a killer tip. The swfs actually work! You can run them inside Bridge and not have to guess what file does what anymore.
Zooming the Loupe in Bridge
Did you know that Bridge now has a loupe tool. This tool is suspiciously like a little brother to the loupe in Apples Aperture. (Alright then, a very little brother). Click on the thumbnail and you will see a zoomed in loupe. Drag across the thumbnail to change position. Click the plus and minus keys to zoom in or out.
______________________________
GENERAL PHOTOSHOP TIPS
Draw straight lines
There are other ways to draw a straight line than using the line tool. After this tip, you may find your need to reach for the line tool reduced, in fact this may even break your addiction. While using any of the drawing tools; Brushes, Pencil, Dodge and Burn, Eraser, Blur, Sharpen and Smudge holding down the shift key will cause you to draw in a perfectly straight line either vertical or horizontal. An added feature will let you create straight lines between points by clicking, Hold down shift and click again anywhere to join the 2 points.
Easy loading of Layer Styles
Start Photoshop> Open your email program if they were emailed to you or navigate to their files on the hard disk> right click/Option Click, then select open and the style set will be loaded automatically
Closing Multiple windows
How long would it take you to close all these documents in Photoshop? Just hold down the shift key when you go File>close and Photoshop will close all the open documents.
Want to use RGB Filters while working in CMYK?
As you know some filters like the render filters are disabled in CMYK. Here is a neat tip, work in RGB mode with CMYK preview turned on. CTRL/CMD+Y build your file as normal then when you are finised, convert it to CMYK. This will allow all the filters to work, give you a smaller file size to work on (used 1/4 less memory) and you won't "lose" your colors when you convert it. Only use CMYK for going to a commercial printing press.
Custom Gradients Made Easy
When you are making a new color gradient and you want to use the same color more than once, don't recreate it. Just hold down the option/Alt key and drag a copy of the slider.
Quick Color Change
To change the color of an image: press Cmd/Ctrl+U this will open the hue/saturation dialog box, slide the hue slider to change the color. Use the saturation to adjust color intensity. Brightness, to adjust... well the brightness. Click on colorize to add color to a grayscale image or to add a "duotone effect to a RGB/CMYK image. I also like to use the hue/saturation to restore some luster to an image after converting for RGB to CMYK
(L) Before and (R) after using the colorize box.
Selection Tips
To constrain a selection to a perfect circle or square hold down the shift key.
To start drawing from the center hold the Alt/Option key.
Ever find that you started drawing a selection and you need to move it while you are drawing? No problem, just hold the spacebar and drag.
Reset Preferences
A lot of Photoshop problems can be fixed by dumping the preferences file: While launching Photoshop, Hold down Alt+Ctrl+shift on the PC or Cmd+Option+Shift on the mac. When asked to reset the preferences say yes.
Before you do this, save your custom Patterns, actions, styles, brushes, gradients, shapes and color pallettes. These will also be reset. Tip: You can create an action to do this, so you have a one click backup! (Don't forget to save the backup action first)
Make a new Document from a layer
Under the layers pallete, when you hit duplicate layer, you can change the document setting to "New" to create a brand new picure from any layer.I wish I knew about this one a few years ago!
Reducing file sizes and speeding up large images,
Even what you can't see, is effecting your file sizes. If you have imported an image that is larger than your canvas size. Select all and crop. You will be surprised how much you can save. Also delete unwanted layers, they can add up a lot too.
Cloning Vat
Whenever you want to duplicate an image on a layer, (eg. you are putting star-bursts everywhere) Just hold the Alt/Option key and drag.. zap, a duplicate. To keep it aligned, also hold down the shift key as you drag.
Color Modes and formats
For the web use RGB and save as a jpeg if its a photo. If you want tranparency, use gif or png. If you need animation save as a gif. For print use CMYK and save as either a tiff or an eps. For most print purposes 300dpi. To print to an inkjet only, RGB and 300 dpi.
Straight Lines with brushes.
To draw a straight line with any of the brush tools just click, hold the shift key and click again anywhere. A straight line will be drawn between the 2 points! Also works with most tools including erasers and even the highlight tool in the Extract filter.
Quick Black and White
If you press Ctl/Cmd+Shift+U all the color will be removed from the selection. If no selection is made, then the entire layer will be turned into grayscale instantly.

0 comments: to “ Easy Tips for Adobe Photoshop CS3 ”
Post a Comment